720 Arcade Joystick

720 Arcade Joystick

720° Arcade Circular Spinner Joystick MAME modification

Home
Progress
Joystick Pictures
MAME: Analog+ How-To-Use

720° Arcade Circular Spinner Joystick MAME modification


This change only affects the 720° driver in Mame. It will allow you to use the original 720° arcade joystick with 720° in Mame. I have tested it and it seems to work very well, but I could use a second opinion on that. Before using it, you must first have a 720° arcade joystick wired to your computer.

See the bottom of this page for source code and binary executables.

How to use the executable for 720°:

1) Connect a 720° joystick to your computer You need to have a 720° arcade joystick wired to your computer. The Optipac from Ultimarc, Oscar's USB mouse interface (I think it would work - ask him), or a mouse hack will do this for you. When mounting the joystick, make sure that the optic sensor for the calibration spinner discs is in the 12 o'clock position.

Opti-Pac:

Here's how my original 720° arcade controller optical encoder wires map to the OptiPac. Please note that with the standard Mame build, the disc with many notches must be wired to the X mouse axis, and the disc with few notches must be wired to the Y axis. (Compiling with Analog MAME would most likely remove this restriction)


Mouse Hack:

I'm very pleased to have gotten a USB mouse hack to work. This should work with a USB or PS/2 mouse. Some mice may not work. (Disclaimer) - I can't promise that you won't break your computer while rigging this up, so don't complain to me if you have problems.

It's really easy to do. It's just a matter of removing the emmitters and receivers from the guts of a mouse, and connecting 4 wires from the joystick's optic card to the holes that you made. There are other web pages out there that may do a better job of explaining some things, but I have had trouble finding pages that explain how to do a USB mouse hack. I also have not found many pages describing hacking a Wico trackball to a mouse. Finally, I've never read pages on how to wire a 720° joystick to a mouse hack, or to an Opti-Pac. I like to have as many sources for how to do this stuff as possible when I'm working on something like this so that I can glean gems from several sources.

LINKS
Soldering 101 - This is where I first learned how to solder.
Mouse Hack Page - This is what I followed to get my mouse hack working.
Another Mouse Hack - Here's a second opinion, similar to the first.

INGREDIENTS & TOOLS:
1 Mouse (PS/2 or USB - some mice may not work, rumor has it that a logitech mouse won't work.)
1 Analog device (This worked with a Wico trackball and a 720° arcade joystick)
Wire
Soldering Iron (low wattage)
Desoldering Braid (ask for it at Radio Shack)
Wire
Electical Solder
Flux

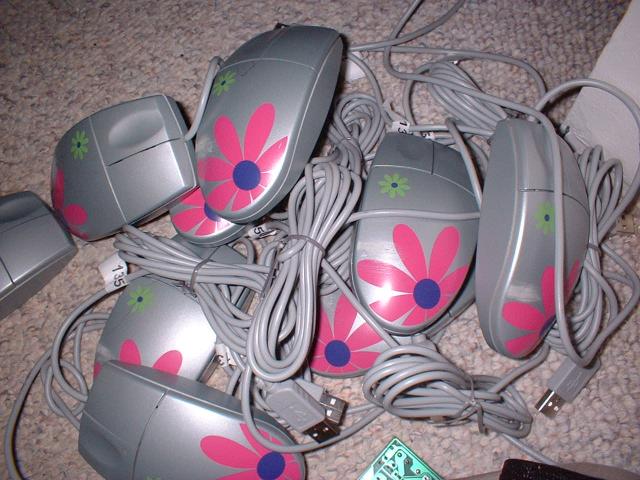
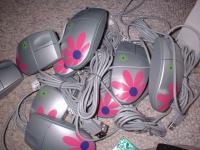
First, grab a mouse from the pile.
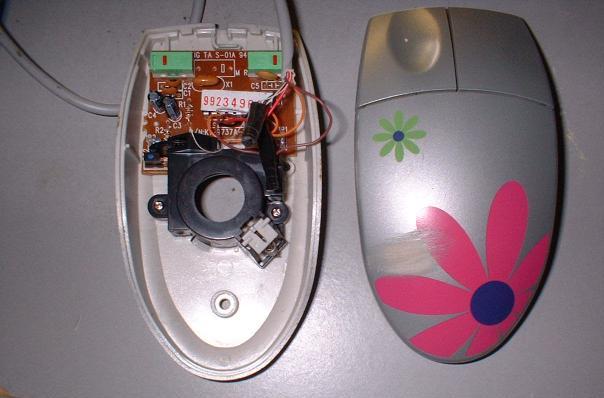
Take the mouse apart.
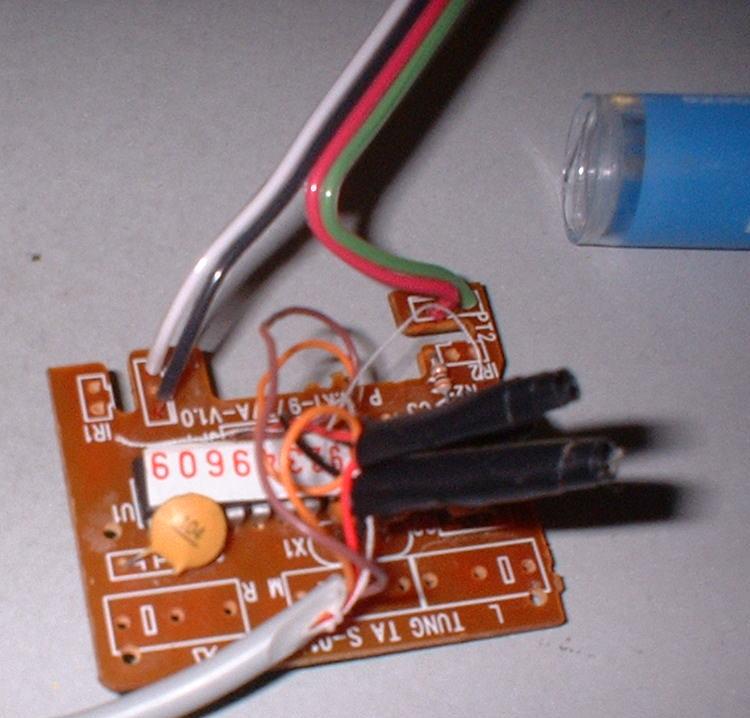
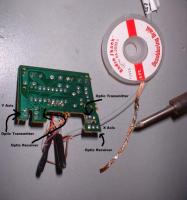
All you will need is the circuitboard with the USB/PS2 wires coming out. Identify the optic transmitter and receiver. My receivers were black. You can be sure of which one is the receiver because it will have 3 legs sticking into the circuit board.
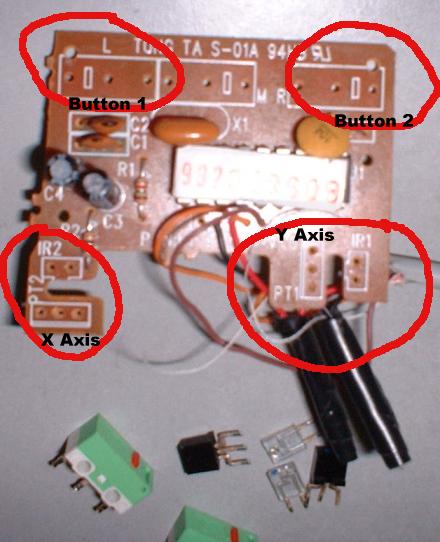
Remove the transmitter and receiver with the soldering iron and the solder wick (It was mentioned on another site that removing the transmitter will cut down on a tiny bit of power consumption - I removed it because it was fun). I also removed the button switches, so that I could use the mouse buttons with the hack.
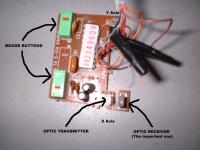
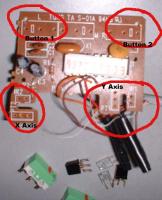
Here's a picture of the mouse board with the X & Y receivers, the X & Y transmitters, the two buttons removed.
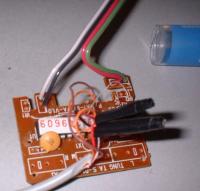
Solder a wire into each of the two outer holes where the receiver (X & Y) used to be. These wires are now X1, X2, Y1, and Y2. Optionally you can experiment with the mouse buttons and add wires to them as well. They can be rigged to an arcade button very easily.
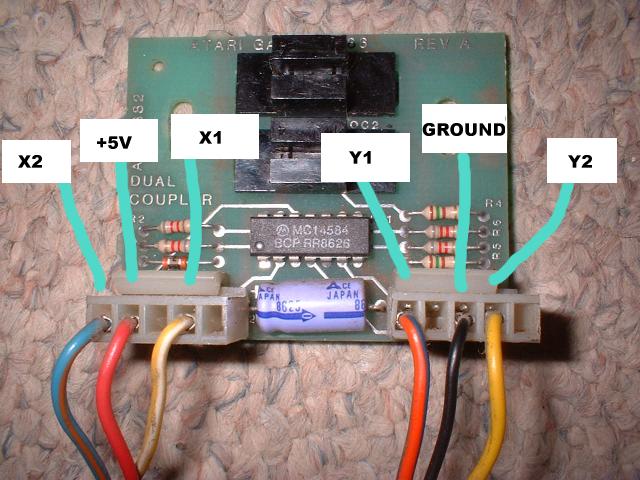
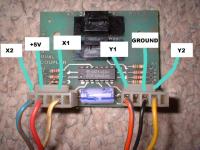
The wires you just attached to the mouse optics (X1, X2, Y1, Y2) can be spliced with the wires coming out of the 720° optic card (X1, X2, Y1, Y2). You may have to switch the wires if you test them out and they spin backwards, or if the primary spinner disc is mapped to the Y mouse axis by accident.
The +5v and Ground wires must be wired to a power supply of some sort. You can tap the PS/2 keyboard port. I tapped an unused USB port but I think that's a bad idea. You may be able to use the +5v and Grounds from the USB mouse, but that was causing me trouble (Perhaps because I was drawing more power than the little mouse could handle). The I-Pac from Ultimarc includes a tap to the PS/2 port. Also, you can tap an unused hard drive power connector from inside your computer, which is probably the best idea (the red wire supplies +5v and either of the black wires are the ground).


2) To make MAME play correctly, you have to go into MAME's settings (with the tab key while playing the game) and set the track_x and track_y sensitivities. I set the Track_x sensitivity to 50% and the Track_y sensitivity to 255%. Your setup may require different settings, so you will just have to play with it to find out what works the best.


How to add the source code changes by hand:

Note: The information regarding Mame modifications on this page is obsolete. As of Mame 142, support for the 720 arcade joystick has been added to the official Mame build, so there is no longer any need to run an old version of Mame Analog+ or build your own old version of Mame in order to use the 720 arcade joystick.


(NOTE: The source code I have listed here is for the changes I made - the actual source code which is now in MAME: Analog+ is slightly different.)

I changed the dial control to a trackball control. The x axis applies to the main spinner disc (with many notches) and the y axis is for the calibration disc.

All I did was to add the y axis as an unused port for the game's driver, and to apply it with the already existing read handler (In the original Mame source code, the value for the second spinner was hard coded to zero. The hooks were there. I suspect that it wasn't included before simply because the expected use was not the original arcade joystick).

In the file, atarisy2.c in the function, "static READ_HANDLER( leta_r )", replace the long series of case statements with the following:

                  case 0: return readinputport(8) & 0xff;
                  case 1: return readinputport(7) & 0xff;

                  case 2: return 0xff;
                  case 3: return 0xff;

Then in the section, "INPUT_PORTS_START( 720 )" replace: Change LETA0 and LETA1 to:
    PORT_START_TAG("LETA0")    /* not direct mapped */  //jake
     PORT_BIT( 0xff, 0x00, IPT_TRACKBALL_X ) PORT_MINMAX(0x00,0xff) PORT_SENSITIVITY(50) PORT_KEYDELTA(1)

     PORT_START_TAG("LETA1") /* not direct mapped */
     PORT_BIT( 0xff, 0x00, IPT_TRACKBALL_Y ) PORT_MINMAX(0x00,0xff) PORT_SENSITIVITY(200) PORT_KEYDELTA(1)


Downloads:

These files allow you to play 720° in Mame using the original 720° arcade joystick.

Source:
The updated 720° driver that applies to Mame 0.110 is here.
The updated 720° driver that applies to Mame 0.104 is here.
A much older version is here.

Binaries:
Here is a Mame (version 0.110) executable compiled with the modified 720° driver, for use with the original arcade joystick. To configure the joystick, launch mame with the "-mouse" switch. I first set the Trackball X axis using the "Analog Controls" option in Mame's tab menu. That told me that my mouse was "Mouse 2". Then, I exited Mame, and opened a text editor and manually edited the Y axis in cfg/720.cfg. Here is what my working 720.cfg file looked like. Note that there is likely a smarter way to configure Mame (ctrlr.ini perhaps?), but I don't have much experience with it. Also, you may need to adjust the mouse sensitivity.

Feel free to email me with a request to compile a newer version for you if you cannot do it yourself (although I can't make any promises!).

Available elsewhere:
The updated 720° driver is in Mame Analog+ as of version 65.2. I'm not sure, but I think that Mame Analog+ stopped working with the 720° arcade joystick after around version ver 0.83.2. Get it from the download section of this site.

This was compiled using MinGW as per the instructions given on MAME.net


Additional notes:


There are some things to be careful about when trying to configure the arcade controller. You may want to make sure that all mouse acceleration is turned off. I'm not sure what centering does in the analog controls menu for Mame, but you might set the value to zero. The values that worked for me were sensitivity X: 50, sensitivity Y: 200. I am using AdvanceMame.

When I first start 720° in Mame with these changes, the FIRST time that I register movement on the calibration spinner, the skateboarder immediately jumps to 12 o'clock, thus initially calibrating it when you spin it the first time. (NOTE: It has been verified that that is how it works in the actual arcade game)

HOME